 Mybatis的运作机制探索
Mybatis 作为成熟的技术,集成到应用也非常简单,编码也非常的灵活。作为一枚后端编码人员,深入学习 Mybatis 对编码能力非常有帮助,只有对内部运作机制深入了解,才能在工作中游刃有余,有利于提高编码质量与效率;并且 Mybatis 技术有许多值得学习和借鉴的东西,非常值得研究一番,本文主要从实战使用出发,一步一步探索它的接口,渐进揭开它神秘的面纱。
核心组件
| 对象 | 相关对象 | 作用 |
|---|---|---|
| Configuration | MapperRegistry TypeAliasRegistry TypeHandlerRegistry | 包含了MyBatis 的所有的配置信息 |
| SqlSession | SqlSessionFactory DefaultSqlSession | 对操作数据库的增删改查的API进行了封装,提供给应用层使用 |
| Executor | BaseExecutor SimpleExecutor BatchExecutor ReuseExecutor | MyBatis执行器,是 MyBatis 调度的核心,负责 SQL语句的生成和查询缓存的维护 |
| StatementHandler | BaseStatementHandler SimpleStatementHandler PreparedStatementHandler CallableStatementHandler | 封装了JDBC Statement操作,负责对JDBCstatement的操作,如设置参数、将 Statement结果集转换成 List集合 |
| ParameterHandler | DefaultParameterHandler | 把用户传递的参数转换成 JDBC Statement 所需要的参数 |
| ResultSetHandler | DefaultResultSetHandler | 把 JDBC返回的 ResultSet结果集对象转换成 List 类型的集合 |
| MapperProxy | MapperProxyFactory | 代理对象,用于代理Mapper接口方法 |
| MappedStatement | SqlSource BoundSql | MappedStatement维护了一条<select|update|delete|insert>节点的封装,包括了SQL信息、入参信息、出参信息 |
# 1. 从启动到结束
接下来跟踪源码核心处理流程,从启动到结束探索Mybatis的运行机制。
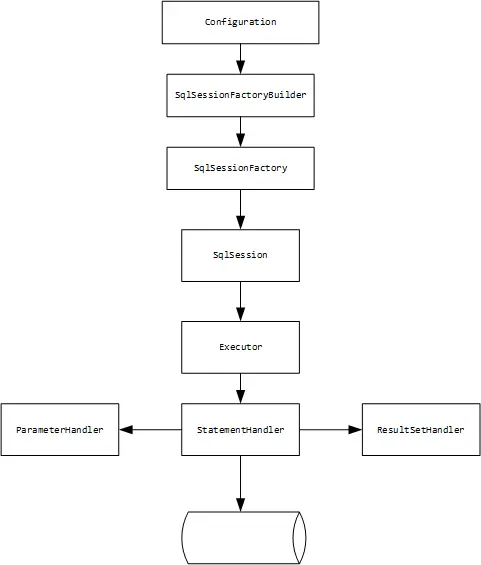
Mybaatis 启动时会先加载配置并解析封装为一个 Configuration 对象,后续所有相关操作都基于 Configuration 实现。当解析配置结束后再通过SqlSessionFactory 获取 SqlSession 对象,然后根据方法 getMapper 得到 MapperProxy 代理类对象,最后执行SQL获取结果。
# 1.1. 加载配置
String resource = "mybatis-config.xml";
InputStream inputStream = Resources.getResourceAsStream(resource);
SqlSessionFactory sqlSessionFactory = new SqlSessionFactoryBuilder().build(inputStream);
2
3
Mybatis配置解析加载如下图
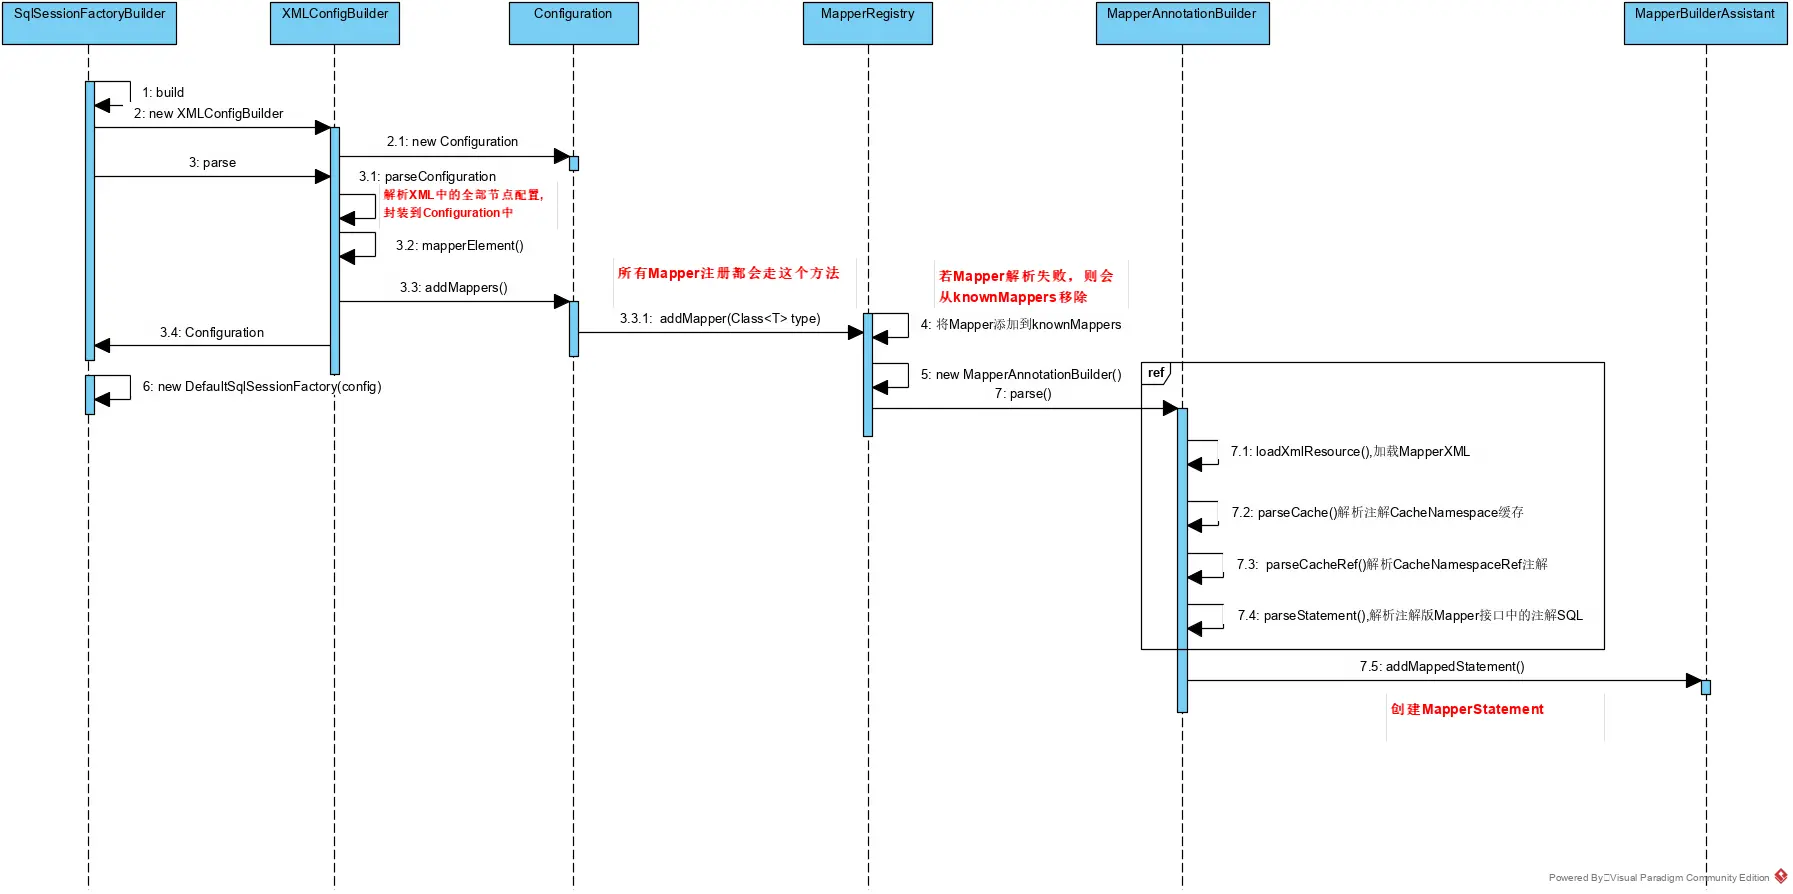
- 通过SqlSessionFactoryBuilder的方法build构建一个XMLConfigBuilder,然后调用parse解析返回Configuration对象
 public SqlSessionFactory build(InputStream inputStream, String environment, Properties properties) {
    try {
      // 通过配置文件,获取一个XMLConfigBuilder,并创建一个Configuration配置
      XMLConfigBuilder parser = new XMLConfigBuilder(inputStream, environment, properties);
      // 解析配置并创建DefaultSqlSessionFactory
      return build(parser.parse());
    } catch (Exception e) {
      throw ExceptionFactory.wrapException("Error building SqlSession.", e);
    } finally {
      ErrorContext.instance().reset();
      try {
        inputStream.close();
      } catch (IOException e) {
        // Intentionally ignore. Prefer previous error.
      }
    }
  }
2
3
4
5
6
7
8
9
10
11
12
13
14
15
16
17
- 通解析XMLConfigBuilder配置并注入相关对象,下面看parse()的解析策略,配置只会被解析一次,通过
parsed = true标识
/**
   * 解析配置文件,这里会做判断,配置文件只会解析一次,当被解析过,不会再次解析
   * @return
   */
  public Configuration parse() {
    if (parsed) {
      throw new BuilderException("Each XMLConfigBuilder can only be used once.");
    }
    parsed = true;
    parseConfiguration(parser.evalNode("/configuration"));
    return configuration;
  }
2
3
4
5
6
7
8
9
10
11
12
/**
   * 解析配置文件中的每一个节点
   * @param root
   */
  private void parseConfiguration(XNode root) {
    try {
      //issue #117 read properties first
      propertiesElement(root.evalNode("properties"));
      Properties settings = settingsAsProperties(root.evalNode("settings"));
      // loadCustomVfs 是获取 Vitual File System 的自定义实现类,比如我们要读取本地
      //文件,或者 FTP 远程文件的时候,就可以用到自定义的 VFS 类。我们根据<settings>标
      //签里面的<vfsImpl>标签,生成了一个抽象类 VFS 的子类,并且赋值到 Configuration中。
      loadCustomVfs(settings);
      // 设置日志实现
      loadCustomLogImpl(settings);
      // 解析<typeAliases>标签
      typeAliasesElement(root.evalNode("typeAliases"));
      // 插件解析(mybatis 插件是基于拦截器实现的)
      pluginElement(root.evalNode("plugins"));

      // 实例化工厂对象
      objectFactoryElement(root.evalNode("objectFactory"));
      objectWrapperFactoryElement(root.evalNode("objectWrapperFactory"));

      reflectorFactoryElement(root.evalNode("reflectorFactory"));
      settingsElement(settings);
      // read it after objectFactory and objectWrapperFactory issue #631
      environmentsElement(root.evalNode("environments"));
      // 支持不同的数据库厂商配置
      databaseIdProviderElement(root.evalNode("databaseIdProvider"));
      // typeHandler 配置
      typeHandlerElement(root.evalNode("typeHandlers"));

      // 加载映射器配置
      mapperElement(root.evalNode("mappers"));
    } catch (Exception e) {
      throw new BuilderException("Error parsing SQL Mapper Configuration. Cause: " + e, e);
    }
2
3
4
5
6
7
8
9
10
11
12
13
14
15
16
17
18
19
20
21
22
23
24
25
26
27
28
29
30
31
32
33
34
35
36
37
38
- 从上述源代码中可得出解析流程如下:
propertiesElement() 第一个是解析<properties>标签,读取我们引入的外部配置文件。这里面又有两种类型,一种是放在 resource 目录下的,是相对路径,一种是写的绝对路径的。解析的最终结果就是我们会把所有的配置信息放到名为 defaults 的 Properties 对象里面,最后把XPathParser 和 Configuration 的 Properties 属性都设置成我们填充后的 Properties对象。
settingsAsProperties() 把<settings>标签也解析成了一个 Properties 对象,对于<settings>标签的子标签的处理在后面
loadCustomVfs(settings) loadCustomVfs 是获取 Vitual File System 的自定义实现类,比如我们要读取本地文件,或者 FTP 远程文件的时候,就可以用到自定义的 VFS 类。我们根据<settings>标签里面的<vfsImpl>标签,生成了一个抽象类 VFS 的子类,并且赋值到Configuration中。
loadCustomLogImpl(settings) loadCustomLogImpl 是根据<logImpl>标签获取日志的实现类,我们可以用到很多的日志的方案,包括 LOG4J,LOG4J2,SLF4J 等等。这里生成了一个 Log 接口的实现类,并且赋值到 Configuration 中
typeAliasesElement() 解析<typeAliases>标签,它有两种定义方式,一种是直接定义一个类的别名,一种就是指定一个包,那么这个package下面所有的类的名字就会成为这个类全路径的别名。类的别名和类的关系,我们放在一个TypeAliasRegistry对象里面维护,它是通过Map存储的。
pluginElement() 解析<plugins>标签,比如 Pagehelper 的翻页插件,或者我们自定义的插件。<plugins>标签里面只有<plugin>标签,<plugin>标签里面只有<property>标签。标签解析完以后,会生成一个Interceptor对象,并且添加到 Configuration 的InterceptorChain 属性里面,它是一个List
objectFactoryElement()、objectWrapperFactoryElement() 接下来的两个标签是用来实例化对象用的,<objectFactory>和<objectWrapperFactory>这两个标签,分别生成ObjectFactory、ObjectWrapperFactory对象,同样设置到Configuration的属性里面。
reflectorFactoryElement() 解析 reflectorFactory 标签,生成 ReflectorFactory 对象(在官方 3.5.1 的 pdf 文档里面没有找到这个配置)。
settingsElement(settings) 这里就是对<settings>标签里面所有子标签的处理了,前面我们已经把子标签全部 Properties 对象,所以在这里处理 Properties 对象就可以了。二级标签里面有很多的配置,比如二级缓存,延迟加载,自动生成主键这些。需要注意的是,我们之前提到的所有的默认值,都是在这里赋值的
environmentsElement() 这里解析数据源环境参数,一个environment就是对应一个数据源,所以在这里我们会根据配置的<transactionManager>创建一个事务工厂,根据<dataSource>标签创建一个数据源,最后把这两个对象设置成Environment对象的属性,放到 Configuration 里面。
databaseIdProviderElement() 解析 databaseIdProvider 标签,生成 DatabaseIdProvider 对象(用来支持不同厂商的数据库)
typeHandlerElement() 跟TypeAlias一样,TypeHandler 有两种配置方式,一种是单独配置一个类,一种是指定一个 package。最后我们得到的是 JavaType 和 JdbcType,以及用来做相互映射的 TypeHandler 之间的映射关系。最后存放在TypeHandlerRegistry对象里面维护。
mapperElement()
解析所有配置的mappers,也就是dao接口对应的SQLXml文件,它解析方式会根据配置方式不同而不同,详见官方文档配置Mappers解析配置 (opens new window),但是无论怎么解析最后都会通过Configuration的方法addMapper放入注册容器mapperRegistry中,详细解析方法如下:
 private void mapperElement(XNode parent) throws Exception {
    if (parent != null) {
      for (XNode child : parent.getChildren()) {
        // 基于包名配置
        /*<!-- 将包内的映射器接口实现全部注册为映射器 -->
        <mappers>
          <package name="org.mybatis.builder"/>
        </mappers>*/
        if ("package".equals(child.getName())) {
          String mapperPackage = child.getStringAttribute("name");
          configuration.addMappers(mapperPackage);// 添加Mapper,获取包名,这里会扫描接口并注入到配置中
        } else {// 基于资源路径配置,可查看官方配置:http://www.mybatis.org/mybatis-3/zh/configuration.html#mappers
          String resource = child.getStringAttribute("resource");
          String url = child.getStringAttribute("url");
          String mapperClass = child.getStringAttribute("class");

          if (resource != null && url == null && mapperClass == null) {// 若基于资源路径配置的,则会XMLMapperBuilder来解析Mapper
            ErrorContext.instance().resource(resource);
            InputStream inputStream = Resources.getResourceAsStream(resource);
            XMLMapperBuilder mapperParser = new XMLMapperBuilder(inputStream, configuration, resource, configuration.getSqlFragments());
            // 解析MapperXML中所有的节点数据
            mapperParser.parse();
          } else if (resource == null && url != null && mapperClass == null) {// 若指定URL则根据URL解析
            ErrorContext.instance().resource(url);
            InputStream inputStream = Resources.getUrlAsStream(url);
            XMLMapperBuilder mapperParser = new XMLMapperBuilder(inputStream, configuration, url, configuration.getSqlFragments());
            mapperParser.parse();
          } else if (resource == null && url == null && mapperClass != null) {//  若指定class,则根据指定的class获取mapper接口类型
            Class<?> mapperInterface = Resources.classForName(mapperClass);
            configuration.addMapper(mapperInterface);
          } else {
            throw new BuilderException("A mapper element may only specify a url, resource or class, but not more than one.");
          }
        }
      }
    }
  }
2
3
4
5
6
7
8
9
10
11
12
13
14
15
16
17
18
19
20
21
22
23
24
25
26
27
28
29
30
31
32
33
34
35
36
37
分析Cofniguration的addMapper方法
 public <T> void addMapper(Class<T> type) {
    mapperRegistry.addMapper(type);
  }
2
3
从源码中可以看出,这里添加Mapper其实就是调用MapperRegistry的方法addMapper,其实内部就是创建一个MapperAnnotationBuilder构造器来解析注解的支持;接口解析不成功时,会被移除掉;注意这里的knownMappers.put(type, new MapperProxyFactor<>(type)),为每一个接口Mapper创建一个MapperProxyFactor工厂,其实我们经常使用到的不是真正的Mapper接口而是一个代理对象,而这个代理对象就是MapperProxyFactor创建的。
public <T> void addMapper(Class<T> type) {
    if (type.isInterface()) {// mapper 必须是接口
      if (hasMapper(type)) {
        throw new BindingException("Type " + type + " is already known to the MapperRegistry.");
      }
      boolean loadCompleted = false;
      try {
        knownMappers.put(type, new MapperProxyFactory<>(type));
        // It's important that the type is added before the parser is run
        // otherwise the binding may automatically be attempted by the
        // mapper parser. If the type is already known, it won't try.
        // Mapper 注解解析器(这里解析是否在Mapper使用了SQL注解写法)
        MapperAnnotationBuilder parser = new MapperAnnotationBuilder(config, type);
        parser.parse();
        loadCompleted = true;
      } finally {
        if (!loadCompleted) {// 解析失败,就直接移除
          knownMappers.remove(type);
        }
      }
    }
  }
2
3
4
5
6
7
8
9
10
11
12
13
14
15
16
17
18
19
20
21
22
MapperAnnotationBuilder解析方法
public void parse() {
    String resource = type.toString();
    if (!configuration.isResourceLoaded(resource)) {
      loadXmlResource();// 加载MapperXML文件
      configuration.addLoadedResource(resource);// 添加已加载文件,表示文件以及被托管加载了
      assistant.setCurrentNamespace(type.getName());// 设置命名空间,其实命名空间就是mapper接口完全限定名
      parseCache();// 解析CacheNamespace注解
      parseCacheRef();// 解析CacheNamespaceRef注解,缓存引用也就是可以为当前Mapper指定于某一个Mapper公用一个缓存
      Method[] methods = type.getMethods();
      for (Method method : methods) {
        try {
          // issue #237
          if (!method.isBridge()) {// 排除桥接方法(解决泛型方法擦除情况)
            parseStatement(method);// 解析其他Statement 注解进行解析
          }
        } catch (IncompleteElementException e) {
          configuration.addIncompleteMethod(new MethodResolver(this, method));
        }
      }
    }
    parsePendingMethods();// 解析未完全解析的方法
  }
2
3
4
5
6
7
8
9
10
11
12
13
14
15
16
17
18
19
20
21
22
# 1.2. 获取会话
当根据Configuration拿到DefaultSqlSessionFactory后就可以创建通过openSessionFromDataSource方法创建SqlSession对象了,如下:
 /**
   *  根据数据源信息获取会话对象
   * @param execType 执行器类型
   * @param level 事务隔离级别
   * @param autoCommit 是否自动提交
   * @return
   */
  private SqlSession openSessionFromDataSource(ExecutorType execType, TransactionIsolationLevel level, boolean autoCommit) {
    Transaction tx = null;
    try {
      // 获取环境信息
      final Environment environment = configuration.getEnvironment();
      // 根据环境获取事务工厂
      final TransactionFactory transactionFactory = getTransactionFactoryFromEnvironment(environment);
      // 创建指定事务
      tx = transactionFactory.newTransaction(environment.getDataSource(), level, autoCommit);
      // 创建SQL执行器
      final Executor executor = configuration.newExecutor(tx, execType);

      return new DefaultSqlSession(configuration, executor, autoCommit);
    } catch (Exception e) {
      closeTransaction(tx); // may have fetched a connection so lets call close()
      throw ExceptionFactory.wrapException("Error opening session.  Cause: " + e, e);
    } finally {
      ErrorContext.instance().reset();
    }
  }
2
3
4
5
6
7
8
9
10
11
12
13
14
15
16
17
18
19
20
21
22
23
24
25
26
27
如上述源码,通过配置文件获取事务环境信息,然后通过getTransactionFactoryFromEnvironment方法获取事务工厂,如下:
  private TransactionFactory getTransactionFactoryFromEnvironment(Environment environment) {
    if (environment == null || environment.getTransactionFactory() == null) {
      return new ManagedTransactionFactory();
    }
    return environment.getTransactionFactory();
  }
2
3
4
5
6
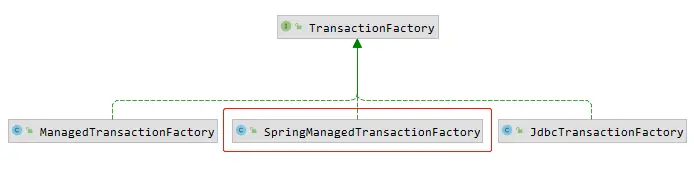
Mybatis事务工厂有两种类型分别是:ManagedTransactionFactory、JdbcTransactionFactory
如果在environment中配置的是 JDBC,则会使用 Connection 对象的 commit()、rollback()、close()管理事务。如果配置成MANAGED,会把事务交给容器来管理。
如果是 Spring+MyBatis,则没有必要配置,因为我们会直接在applicationContext.xml里面配置数据源和事务管理器,覆盖 MyBatis 的配置,当然也可以自自定义实现。
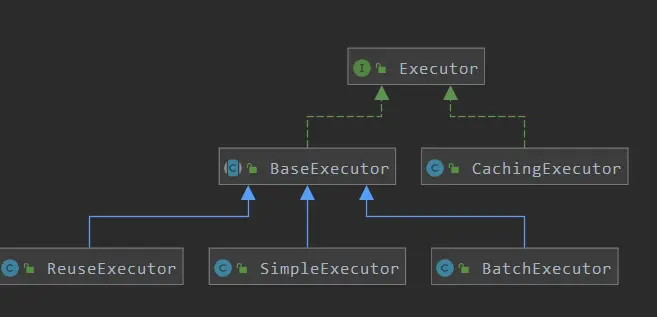
接下来会根据工厂创建一个事务,然后创建执行器Executor,默认情况下创建SimpleExecutor,这里有Executor的基本类型有三种:SIMPLE、BATCH、REUSE,默认是 SIMPLE(settingsElement()读取默认值),他们都继承了抽象类 BaseExecutor。
 /**
   * 根据执行器类型创建执行器,默认创建{@link ExecutorType#SIMPLE}类型执行器
   */
  public Executor newExecutor(Transaction transaction, ExecutorType executorType) {
    executorType = executorType == null ? defaultExecutorType : executorType;
    executorType = executorType == null ? ExecutorType.SIMPLE : executorType;
    Executor executor;
    if (ExecutorType.BATCH == executorType) {
      executor = new BatchExecutor(this, transaction);
    } else if (ExecutorType.REUSE == executorType) {// Statement复用执行器
      executor = new ReuseExecutor(this, transaction);
    } else {
      executor = new SimpleExecutor(this, transaction);
    }
    if (cacheEnabled) {// 二级缓存执行器
      executor = new CachingExecutor(executor);
    }
    // 将执行器加入到拦截器链中
    executor = (Executor) interceptorChain.pluginAll(executor);
    return executor;
  }
2
3
4
5
6
7
8
9
10
11
12
13
14
15
16
17
18
19
20
21
三种Executor的区别:
- SimpleExecutor: 每执行一次update或select,就开启一个Statement对象,用完立刻关闭Statement对象。
- ReuseExecutor: 执行update或select,以sql作为key查找Statement对象,存在就使用,不存在就创建,用完后,不关闭Statement对象,而是放置于Map内,供下一次使用。简言之,就是重复使用Statement对象。
- BatchExecutor: 执行update(没有select,JDBC批处理不支持select),将所有sql都添加到批处理中(addBatch()),等待统一执行executeBatch(),它缓存了多个Statement对象,每个Statement对象都是addBatch()完毕后,等待逐一执行executeBatch()批处理;与JDBC批处理相同。
# 1.3. 执行SQL
SqlSession session = sqlSessionFactory.openSession();
BlogMapper mapper = session.getMapper(BlogMapper.class);
mapper.selectBlogById(1)// 调用mapper方法,实际上mapper是一个代理对象
2
3
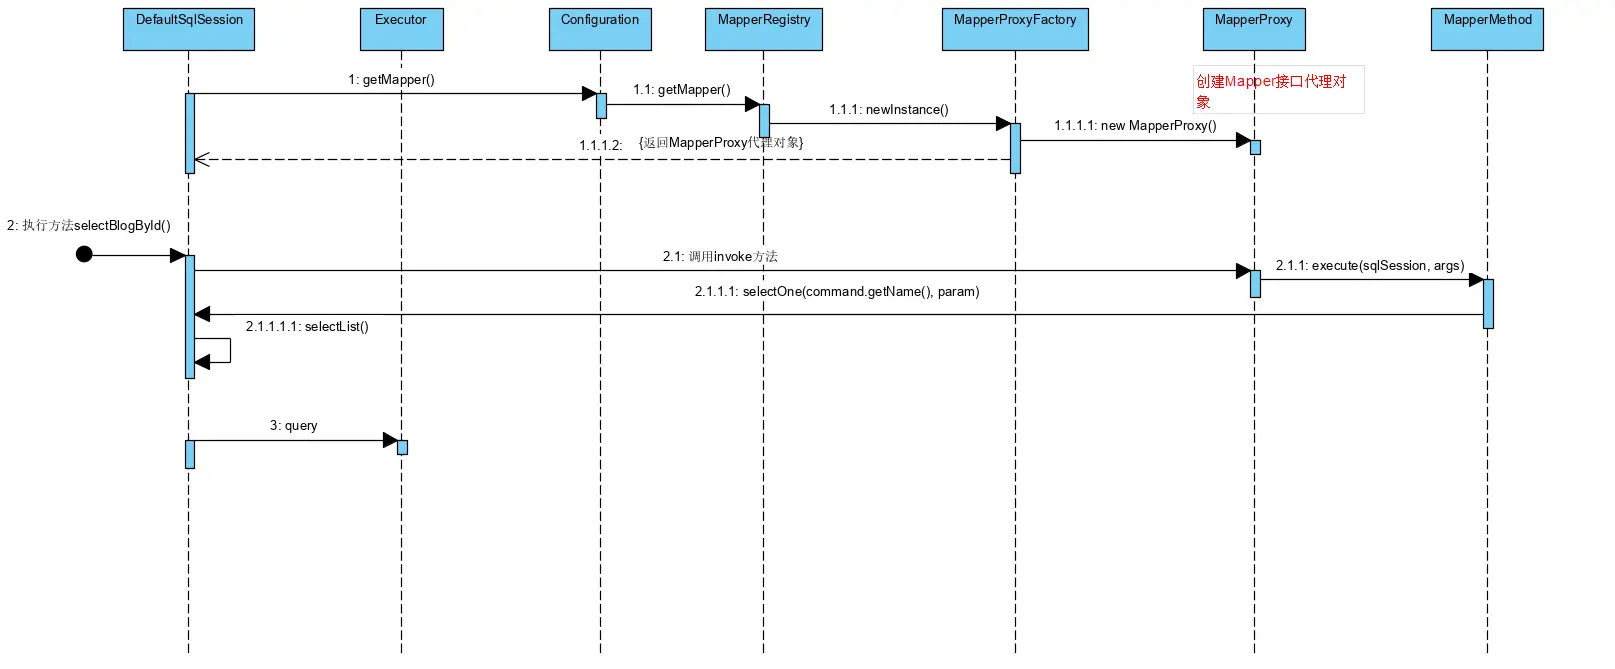
- getMapper其实就是调用MapperRegistry的getMapper方法
DefaultSqlSession#getMapper --> configuration#getMapper --> mapperRegistry#getMapper
public <T> T getMapper(Class<T> type, SqlSession sqlSession) {
    final MapperProxyFactory<T> mapperProxyFactory = (MapperProxyFactory<T>) knownMappers.get(type);
    if (mapperProxyFactory == null) {
      throw new BindingException("Type " + type + " is not known to the MapperRegistry.");
    }
    try {
      return mapperProxyFactory.newInstance(sqlSession);
    } catch (Exception e) {
      throw new BindingException("Error getting mapper instance. Cause: " + e, e);
    }
  }
2
3
4
5
6
7
8
9
10
11
protected T newInstance(MapperProxy<T> mapperProxy) {
    return (T) Proxy.newProxyInstance(mapperInterface.getClassLoader(), new Class[] { mapperInterface }, mapperProxy);
}

public T newInstance(SqlSession sqlSession) {
    final MapperProxy<T> mapperProxy = new MapperProxy<>(sqlSession, mapperInterface, methodCache);
    return newInstance(mapperProxy);
  }
2
3
4
5
6
7
8
9
之前加载Mpper接口的时候调用MapperRegistry#addMapper方法时为每个Mapper创建了一个MapperProxyFactory对象,就是在这里起作用了。 通过Mapper接口获取到Mapper工厂后,创建一个接口代理对象,所以这其实返回的就是一个MapperProxy
- 执行SQL
这里我们要看代理类的invoke方法,因为返回的Mapper是接口的代理MapperProxy对象,MapperProxy实现如下:
public class MapperProxy<T> implements InvocationHandler, Serializable {
  private static final long serialVersionUID = -6424540398559729838L;
  private final SqlSession sqlSession;
  private final Class<T> mapperInterface;
  private final Map<Method, MapperMethod> methodCache;

  public MapperProxy(SqlSession sqlSession, Class<T> mapperInterface, Map<Method, MapperMethod> methodCache) {
    this.sqlSession = sqlSession;
    this.mapperInterface = mapperInterface;
    this.methodCache = methodCache;
  }

  @Override
  public Object invoke(Object proxy, Method method, Object[] args) throws Throwable {
    try {
      if (Object.class.equals(method.getDeclaringClass())) {// Object方法
        return method.invoke(this, args);
      } else if (method.isDefault()) {// Java 8 默认方法
        return invokeDefaultMethod(proxy, method, args);
      }
    } catch (Throwable t) {
      throw ExceptionUtil.unwrapThrowable(t);
  }
    final MapperMethod mapperMethod = cachedMapperMethod(method);// 缓存Mapper方法
    // 调用接口成方法
    return mapperMethod.execute(sqlSession, args);
  }
  /**
   * 获取缓存,保存了方法签名和接口方法的关系
   * 这里加入缓存是为了提升 MapperMethod 的获取速度
   * @param method
   * @return
   */
  private MapperMethod cachedMapperMethod(Method method) {
    // 只有 key 不存在或者 value 为 null 的时候才调mappingFunction
    return methodCache.computeIfAbsent(method, k -> new MapperMethod(mapperInterface, method, sqlSession.getConfiguration()));
  }

  private Object invokeDefaultMethod(Object proxy, Method method, Object[] args)
      throws Throwable {
    final Constructor<MethodHandles.Lookup> constructor = MethodHandles.Lookup.class.getDeclaredConstructor(Class.class, int.class);
    if (!constructor.isAccessible()) {
      constructor.setAccessible(true);
    }
    final Class<?> declaringClass = method.getDeclaringClass();
    return constructor.newInstance(declaringClass, MethodHandles.Lookup.PRIVATE
                | MethodHandles.Lookup.PROTECTED
                | MethodHandles.Lookup.PACKAGE
                | MethodHandles.Lookup.PUBLIC).unreflectSpecial(method, declaringClass).bindTo(proxy).invokeWithArguments(args);
  }
}
2
3
4
5
6
7
8
9
10
11
12
13
14
15
16
17
18
19
20
21
22
23
24
25
26
27
28
29
30
31
32
33
34
35
36
37
38
39
40
41
42
43
44
45
46
47
48
49
50
51
接下来就会调用MapperMethod对象的execute方法,根据不同的类型执行调用SqlSession的insert()、update()、delete()、selectOne()方法,然后处理结果并返回:
public Object execute(SqlSession sqlSession, Object[] args) {
    Object result;
    switch (command.getType()) {
      case INSERT: {
        Object param = method.convertArgsToSqlCommandParam(args);// 将参数转换为SQL参数
        result = rowCountResult(sqlSession.insert(command.getName(), param));
        break;
      }
      case UPDATE: {
        Object param = method.convertArgsToSqlCommandParam(args);// 将参数转换为SQL参数
        result = rowCountResult(sqlSession.update(command.getName(), param));
        break;
      }
      case DELETE: {
        Object param = method.convertArgsToSqlCommandParam(args);// 将参数转换为SQL参数
        result = rowCountResult(sqlSession.delete(command.getName(), param));
        break;
      }
      case SELECT:
        // 无返回值
        if (method.returnsVoid() && method.hasResultHandler()) {
          executeWithResultHandler(sqlSession, args);
          result = null;
          // 多个返回值
        } else if (method.returnsMany()) {
          result = executeForMany(sqlSession, args);
          // 返回值是Map类型
        } else if (method.returnsMap()) {
          result = executeForMap(sqlSession, args);
        } else if (method.returnsCursor()) {
          result = executeForCursor(sqlSession, args);
        } else {
          Object param = method.convertArgsToSqlCommandParam(args);// 将参数转换为SQL参数
          result = sqlSession.selectOne(command.getName(), param);
          if (method.returnsOptional()
              && (result == null || !method.getReturnType().equals(result.getClass()))) {
            result = Optional.ofNullable(result);
          }
        }
        break;
      case FLUSH:
        result = sqlSession.flushStatements();
        break;
      default:
        throw new BindingException("Unknown execution method for: " + command.getName());
    }
    if (result == null && method.getReturnType().isPrimitive() && !method.returnsVoid()) {
      throw new BindingException("Mapper method '" + command.getName()
          + " attempted to return null from a method with a primitive return type (" + method.getReturnType() + ").");
    }
    return result;
  }
2
3
4
5
6
7
8
9
10
11
12
13
14
15
16
17
18
19
20
21
22
23
24
25
26
27
28
29
30
31
32
33
34
35
36
37
38
39
40
41
42
43
44
45
46
47
48
49
50
51
52
下面以查询为例分析一下执行SqlSession具体流程:
- DefaultSqlSession.selectOne() 其实就是执行selectList方法,只不过只返回一行,如果查询结果有多行则抛出异常;
 public <E> List<E> selectList(String statement, Object parameter, RowBounds rowBounds) {
    try {
      MappedStatement ms = configuration.getMappedStatement(statement);
      return executor.query(ms, wrapCollection(parameter), rowBounds, Executor.NO_RESULT_HANDLER);
    } catch (Exception e) {
      throw ExceptionFactory.wrapException("Error querying database.  Cause: " + e, e);
    } finally {
      ErrorContext.instance().reset();
    }
  }
2
3
4
5
6
7
8
9
10
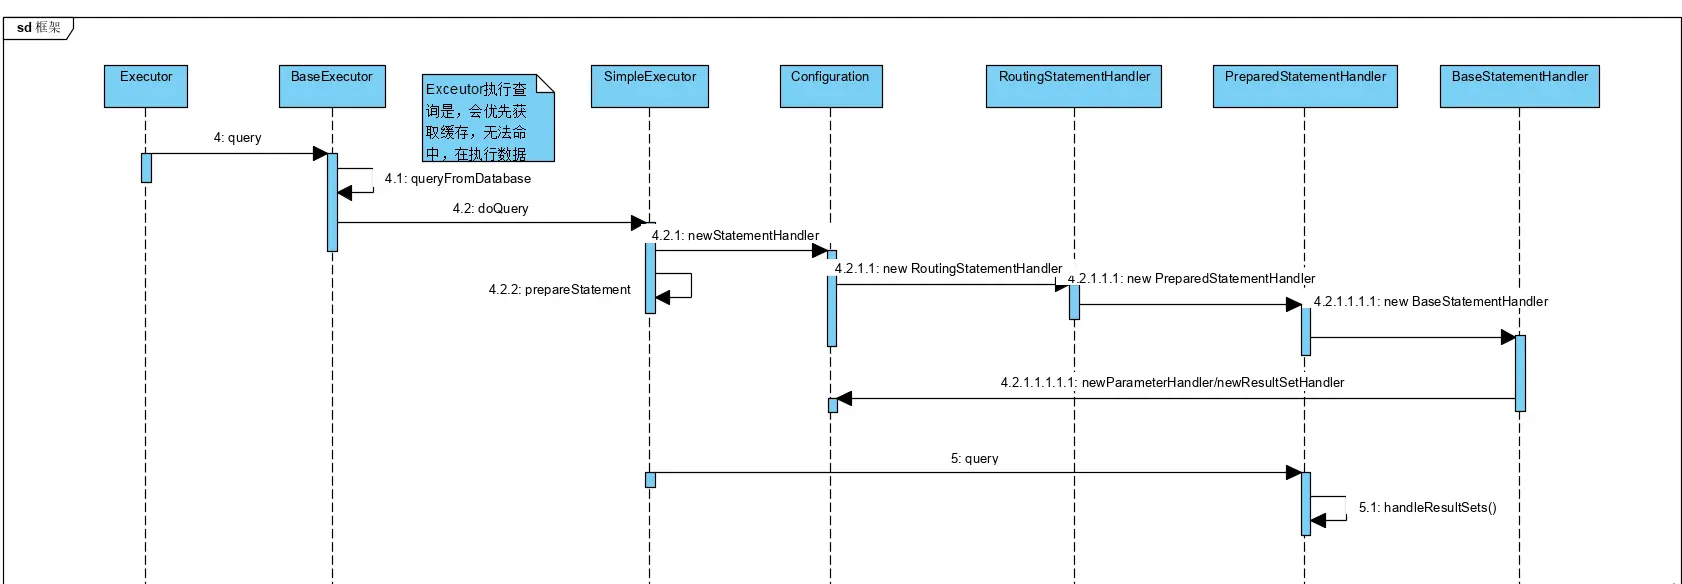
然后会根据statement id 获取MappedStatement,再执行Executor的query方法,到这里就会根据不同的配置走不同Exectuor,若开启的是二级缓存,会先执行CachingExecutor的query方法,若命中缓存则返回,若没有命中则走delegate#query也就是BaseExecutor的Query。
接着会创建一个CacheKey,也就是缓存的Key,然后判断是否需要清除缓存,若缓存没有命中,则执行queryFromDatabase方法其实就是调用SimpleExecutor的doQuery方法;
public <E> List<E> query(MappedStatement ms, Object parameter, RowBounds rowBounds, ResultHandler resultHandler, CacheKey key, BoundSql boundSql) throws SQLException {
    ErrorContext.instance().resource(ms.getResource()).activity("executing a query").object(ms.getId());
    if (closed) {
      throw new ExecutorException("Executor was closed.");
    }
    if (queryStack == 0 && ms.isFlushCacheRequired()) {
      clearLocalCache();
    }
    List<E> list;
    try {
      queryStack++;
      list = resultHandler == null ? (List<E>) localCache.getObject(key) : null;
      if (list != null) {
        handleLocallyCachedOutputParameters(ms, key, parameter, boundSql);
      } else {
        list = queryFromDatabase(ms, parameter, rowBounds, resultHandler, key, boundSql);
      }
    } finally {
      queryStack--;
    }
    if (queryStack == 0) {
      for (DeferredLoad deferredLoad : deferredLoads) {
        deferredLoad.load();
      }
      // issue #601
      deferredLoads.clear();
      if (configuration.getLocalCacheScope() == LocalCacheScope.STATEMENT) {
        // issue #482
        clearLocalCache();
      }
    }
    return list;
  }
2
3
4
5
6
7
8
9
10
11
12
13
14
15
16
17
18
19
20
21
22
23
24
25
26
27
28
29
30
31
32
33
- 执行doQuery时,会做几件事情:根据statement类型创建不同的StatementHandler;创建StatementHandler的同时,也会创建ParameterHandler、newResultSetHandler,前者用于处理参数、后者用于处理结果集;
  public <E> List<E> doQuery(MappedStatement ms, Object parameter, RowBounds rowBounds, ResultHandler resultHandler, BoundSql boundSql) throws SQLException {
    Statement stmt = null;
    try {
      Configuration configuration = ms.getConfiguration();
      StatementHandler handler = configuration.newStatementHandler(wrapper, ms, parameter, rowBounds, resultHandler, boundSql);
      stmt = prepareStatement(handler, ms.getStatementLog());// 获取连接、并做预编译处理
      return handler.query(stmt, resultHandler);
    } finally {
      closeStatement(stmt);
    }
  }
2
3
4
5
6
7
8
9
10
11
- 然后执行StatementHandler对应得query方法,获取到执行SQL,然后执行execute方法,最后调用之前初始化好的ResultSetHandler对结果进行处理,对结果集的处理Mybatis有一个默认实现类DefaultResultSetHandler。
public <E> List<E> query(Statement statement, ResultHandler resultHandler) throws SQLException {
    String sql = boundSql.getSql();
    statement.execute(sql);
    return resultSetHandler.handleResultSets(statement);
  }
2
3
4
5
# 2. 缓存解析
缓存目的是解决数据压力,提高数据读取效率,不过Mybatis的缓存,我们一般不会使用原生的,因为Mybatis缓存单一,仅支持到会话、SQL语句级别,在生成系统同业务复杂可能涉及到跨业务、跨系统缓存;
Mybatis默认是开启一级缓存的;若想实现高性能的缓存,最好使用第三方的,如Redis等等。
<!-- STATEMENT级别的缓存,只针对当前执行的 statement 有效,每次清理本地缓存,关闭默认一级缓存 -->
<!--<setting name="localCacheScope" value="STATEMENT"/>-->
<!-- SESSION级别的缓存,属于Statement级别缓存,默认值,即一级缓存-->
<setting name="localCacheScope" value="SESSION"/>
2
3
4
- Mybatis内部结构
PerpetualCache就是Mybatis的核心实现,其他相关缓存规则都是基于当前PerpetualCache实现的
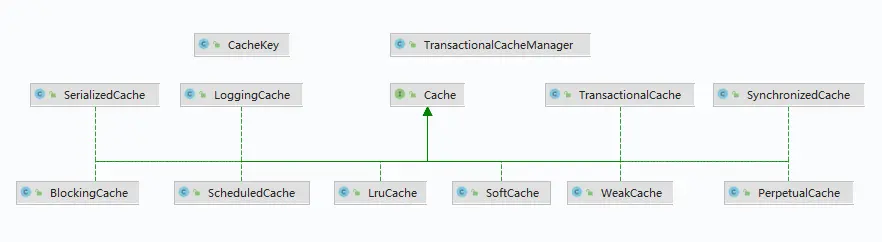
缓存策略列表如下
| 缓存实现类 | 描述 | 作用 | 装饰条件 |
|---|---|---|---|
| 基本缓存 | 缓存基本实现类 | 默认是 PerpetualCache,也可以自定义比如 RedisCache、EhCache等,具备基本功能的缓存类 | |
| LruCache | LRU策略的缓存 | 当缓存到达上限时候,删除最近最少使用的缓存 (Least Recently Use) | eviction="LRU"(默认) |
| FifoCache | FIFO 策略的缓存 | FIFO策略的缓存 | eviction="FIFO" |
| SoftCache WeakCache | 带清理策略的缓存 | 通过 JVM的软引用和弱引用来实现缓存,当JVM 内存不足时,会自动清理掉这些缓存,基于 SoftReference和WeakReference | eviction="SOFT" eviction="WEAK" |
| LoggingCache | 带日志功能的缓存 | 比如:输出缓存命中率 | |
| SynchronizedCache | 同步缓存 | 基于synchronized关键字实现,解决并发问题 | |
| BlockingCache | 阻塞缓存 | 通过在 get/put方式中加锁,保证只有一个线程操作缓存,基于Java重入锁实现 | blocking=true |
| ScheduledCache | 定时调度的缓存定时调度的缓存 | 在进行 get/put/remove/getSize等操作前,判断缓存时间是否超过了设置的最长缓存时间(默认是一小时),如果是则清空缓存--即每隔一段时间清空一次缓存 | flushInterval不为空 |
| TransactionalCache | 事务缓存 | 在二级缓存中使用,可一次存入多个缓存,移除多个缓存 | TransactionalCacheManager中用Map维护对应关系 |
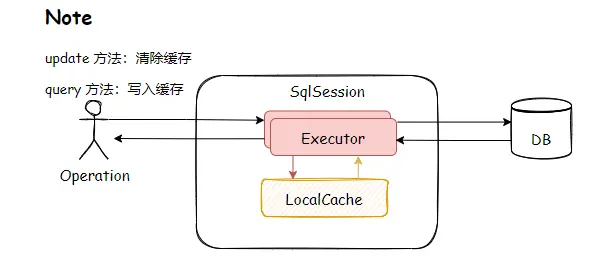
- 一级缓存
默认Mybatis是自动开启一级缓存的
DefaultSqlSession 里面只有两个属性,Configuration 是全局的,所以缓存只可能放在 Executor 里面维护——SimpleExecutor/ReuseExecutor/BatchExecutor 的父类 BaseExecutor 的构造函数中持有了 PerpetualCache。在同一个会话里面,多次执行相同的 SQL 语句,会直接从内存取到缓存的结果,不会再发送 SQL 到数据库。但是不同的会话里面,即使执行的 SQL 一模一样(通过一个Mapper 的同一个方法的相同参数调用),也不能使用到一级缓存。
一级缓存的缺点
使用一级缓存的时候,因为缓存不能跨会话共享,不同的会话之间对于相同的数据可能有不一样的缓存。在有多个会话或者分布式环境下,会存在脏数据的问题。如果要解决这个问题,就要用到二级缓存。
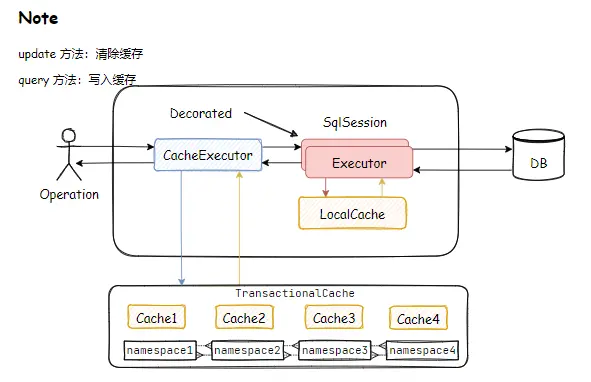
- 二级缓存
二级缓存是用来解决一级缓存不能跨会话共享的问题的,范围是 namespace 级别的,也可以跨 namespace 共享,可以被多个 SqlSession 共享(只要是同一个接口里面的相同方法,都可以共享),生命周期和应用同步。
实际上 MyBatis 用了一个装饰器的类来维护,就是 CachingExecutor。如果启用了二级缓存,MyBatis 在创建 Executor 对象的时候会对 Executor 进行装饰。CachingExecutor 对于查询请求,会判断二级缓存是否有缓存结果,如果有就直接返回,如果没有委派交给真正的查询器 Executor 实现类,比如 SimpleExecutor 来执行查询,再走到一级缓存的流程。最后会把结果缓存起来,并且返回给用户。
- 优缺点
虽然使用mybatis缓存能够降低数据库一定的压力,但是它对业务并不是特别友好,因为它是基于sql层面做缓存的,算是一个粗糙的实现,如:对商品信息进行缓存,由于商品信息查询访问量大,但是要求用户每次都能查询最新的商品信息,缓存就无法实现当一个商品变化时只刷新该商品的缓存信息而不刷新其它商品的信息,因为mybaits的二级缓存区域以mapper为单位划分,当一个商品信息变化会将所有商品信息的缓存数据全部清空。
# 3. 自定义插件
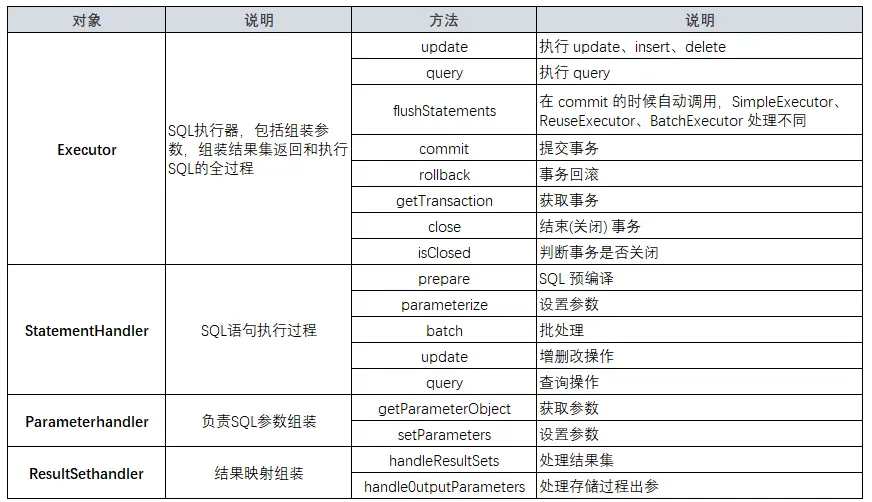
MyBatis通过提供插件机制,让我们可以根据自己的需要去增强MyBatis的功能。需要注意的是,如果没有完全理解MyBatis的运行原理和插件的工作方式,最好不要使用插件,因为它会改变系底层的工作逻辑,给系统带来很大的影响。
Mybatis插件是基于拦截器链、代理模式实现的,可以拦截的对象和方法如下:
- 实现
@Intercepts({@Signature(type = Executor.class,method = "query",
        args = {MappedStatement.class, Object.class, RowBounds.class, ResultHandler.class})
})
public class MyPageInterceptor implements Interceptor {
    @Override
    public Object intercept(Invocation invocation) throws Throwable {
        System.out.println("将逻辑分页改为物理分页");
        Object[] args = invocation.getArgs();
        MappedStatement ms = (MappedStatement) args[0]; // MappedStatement
        BoundSql boundSql = ms.getBoundSql(args[1]); // Object parameter
        RowBounds rb = (RowBounds) args[2]; // RowBounds
        // RowBounds为空,无需分页
        if (rb == RowBounds.DEFAULT) {
            return invocation.proceed();
        }
        // 将原 RowBounds 参数设为 RowBounds.DEFAULT,关闭 MyBatis 内置的分页机制
        //args[2] = RowBounds.DEFAULT;

        // 在SQL后加上limit语句
        String sql = boundSql.getSql();
        String limit = String.format("LIMIT %d,%d", rb.getOffset(), rb.getLimit());
        sql = sql + " " + limit;
        // 自定义sqlSource
        SqlSource sqlSource = new StaticSqlSource(ms.getConfiguration(), sql, boundSql.getParameterMappings());
        // 修改原来的sqlSource
        Field field = MappedStatement.class.getDeclaredField("sqlSource");
        field.setAccessible(true);
        field.set(ms, sqlSource);
        // 执行被拦截方法
        return invocation.proceed();
    }
    @Override
    public Object plugin(Object target) {
        return Plugin.wrap(target, this);
    }
    @Override
    public void setProperties(Properties properties) {
    }
}
2
3
4
5
6
7
8
9
10
11
12
13
14
15
16
17
18
19
20
21
22
23
24
25
26
27
28
29
30
31
32
33
34
35
36
37
38
39
- 实现要点
- 需要实现接口
org.apache.ibatis.plugin.Interceptor中的方法,如上实例方法。 - 添加
@Intercepts({@Signature(type = Executor.class,method = "query", args = {MappedStatement.class, Object.class, RowBounds.class, ResultHandler.class}) }),定义拦截器签名信息,以及需要拦截的方法和方法中的参数。 - 实现 Interceptor 中的方法即可
public interface Interceptor {
    // 用于覆盖被拦截对象的原有方法(在调用代理对象 Plugin 的 invoke()方法时被调用)
    Object intercept(Invocation invocation) throws Throwable;

    // target 是被拦截对象,这个方法的作用是给被拦截对象生成一个代理对象,并返回它
    Object plugin(Object target);

    // 设置参数
    void setProperties(Properties properties);
}
2
3
4
5
6
7
8
9
10
Executor 是 调用 SqlSessionFactory#openSession() 方法的时候创建的,StatementHandler 是在 SimpleExecutor.doQuery() 创建的,其中包含了处理参数的 ParameterHandler 和处理结果集的ResultSetHandler 的创建,创建之后即调用 InterceptorChain.pluginAll(),返回层层代理后的对象。
当存在多个插件时,组合形成一层层的代理。
如下图,箭头指向为构建插件代理对象的顺序,分别为 Plugin A > Plugin B > Plugin C ,在配置文件中定义的 XML 配置先后顺序即为配置顺序。
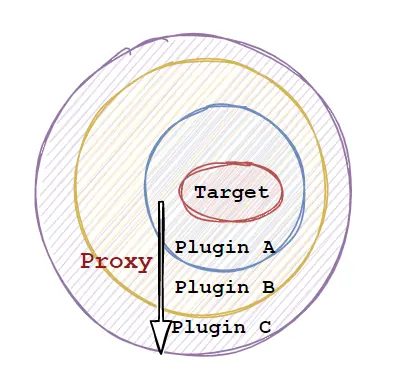
插件中的代理对象是通过 Plugin.wrap(target, this) 创建,在定义插件实现 Interceptor 接口时,可以通过该静态方法来返回代理对象,如果存在多个插件,则层层生成对应的代理,如上图代理构建顺序为 Plugin A > Plugin B > Plugin C,经过代理后返回的是 Plugin C 代理对象,当指向插件拦截方法时顺序为 Plugin C > Plugin B > Plugin A。
因为代理类是 Plugin,所以最后调用的是 Plugin 的 invoke() 方法。它先调用了定义的拦截器的 intercept() 方法。可以通过 invocation.proceed() 调用到被代理对象被拦截的方法。
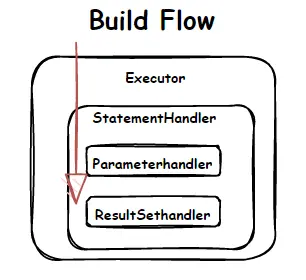
四大组件组成、创建时间如上图,代理对象是在创建组件的时候,通过 InterceptorChain#pluginAll 方法获得。
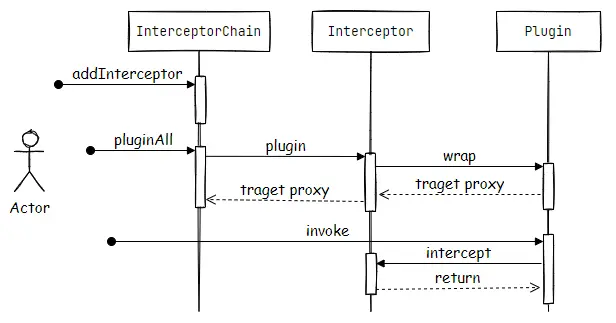
- 插件的执行流程
在 Mybatis 中插件的配置处理通过 Configuration 对象来完成,根据定义的先后顺序调用 InterceptorChai#addInterceptor 添加;
然后在通过 Interceptor 定义的插件拦截器接口实现,通过 Plugin#wrap 创建 JDK 代理返回,因为 Plugin 实现代理的接口 InvocationHandler ,这里也可以不返回代理,直接返回目标对象;
最后在调用目标方法时,调用 Plugin#invoke ,根据定义插件拦截器 Interceptor 的签名,触发 intercept 方法调用,完成业务实现。
# 4. 集成Spring
一般在项目中很少单独使用 Mybatis 组件,而是通过 Spring 集成在项目中使用;Mybatis 也提供给集成组件,实际集成也很简单,还是在于对几大核心对象的处理。
# 4.1. 集成方式
- 引入依赖
<dependency>
    <groupId>org.mybatis</groupId>
    <artifactId>mybatis-spring</artifactId>
    <version>2.0.0</version>
</dependency>
2
3
4
5
- 基于xml方式
- 引入SqlSessionFactoryBean配置
<!-- 在Spring启动时创建 sqlSessionFactory,它主要用于解析配置 -->
    <bean id="sqlSessionFactory" class="org.mybatis.spring.SqlSessionFactoryBean">
        <property name="configLocation" value="classpath:mybatis-config.xml"></property>
        <property name="mapperLocations" value="classpath:mapper/*.xml"></property>
        <property name="dataSource" ref="dataSource"/>
    </bean>
2
3
4
5
6
- 配置Mapper接口扫描的包
 <bean id="mapperScanner" class="org.mybatis.spring.mapper.MapperScannerConfigurer">
        <property name="basePackage" value="com.bdr.crud.dao"/>
</bean>
2
3
说明: 这里配置需要扫描的Mapper包,还可以通过注解 @MapperScan 实现和<mybatis-spring:scan basepackage="com.bdr.crud.dao"/>
- 基于 SpringBoot 注解方式
其实Boot配置方式同XML配置原理相同,starter提供了很多自动配置的参数
- 添加依赖
<dependency>
    <groupId>org.mybatis.spring.boot</groupId>
    <artifactId>mybatis-spring-boot-starter</artifactId>
    <version>2.1.0</version>
</dependency>
2
3
4
5
- 添加application.properties配置
# 配置mybatis配置文件路径,其实这里可以不作用指定配置xml文件,直接通过mybatis为前缀的配置,在properties中配置
# mybatis.config-location=classpath:mybatis-config.xml
# 指定别名需要扫描的包,可以在Mapper的XML中使用别名
#mybatis.type-aliases-package=com.bdr.mybatis.domain
# mapper文件路径
mybatis.mapper-locations=classpath*:/mappers/*.xml
mybatis.configuration.map-underscore-to-camel-case=true
spring.datasource.url=jdbc:mysql://127.0.0.1:3306/mybatis?useUnicode=true&characterEncoding=utf-8&rewriteBatchedStatements=true&serverTimezone=UTC
spring.datasource.username=root
spring.datasource.password=
spring.datasource.driver-class-name=com.mysql.cj.jdbc.Driver

# 日志级别
logging.level.root=WARN
logging.level.com.bdr.mybatis.mapper=TRACE
2
3
4
5
6
7
8
9
10
11
12
13
14
15
由于SpringBoot的盛行,现在基于 SpringBoot 方式官方也提供 starter,很容易配置,可参考https://github.com/mybatis/spring-boot-starter (opens new window)
# 4.2. 机制与原理
Spring 集成 Mybatis 就是在原生配置的基础上加上装饰适配 Spring 体系,封装了 SqlSession、SqlSessionFactory、SqlSessionFactoryBuilder 以及装载配置,得以适配Spring,开发时只需要引入 mybatis-spring 组件即可,Spring 集成无非就是怎么自动加载配置文件,装配Mybatis内部Mapper信息,怎么把Mapper接口交给Spring容器管理,而开发过程中只需要以 @Autowired 方式注入即可使用。
如下核心组件实现
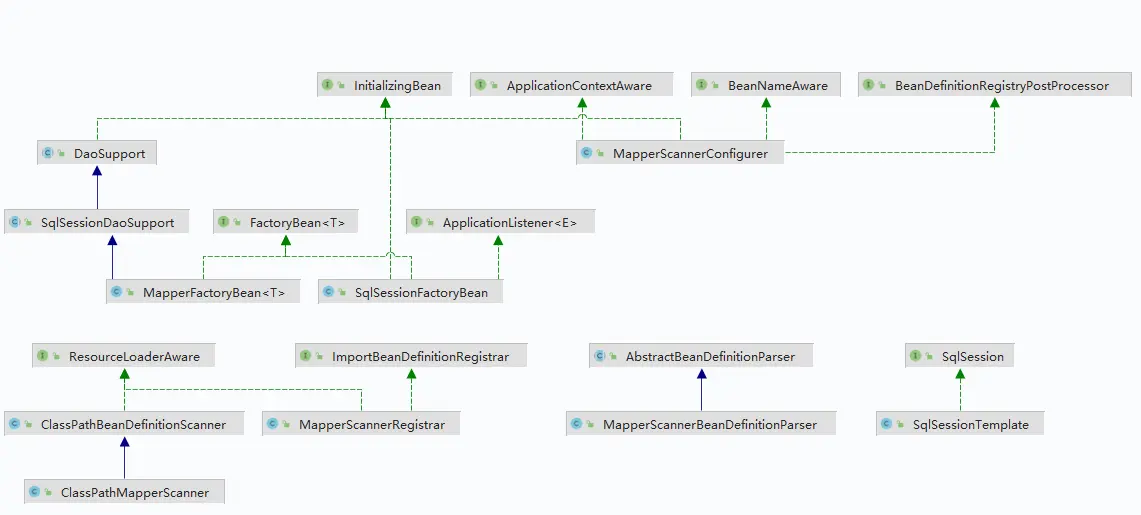
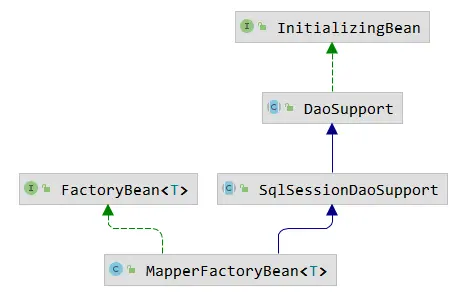
- SqlSessionFactoryBean 主要负责加载Mybatis配置文件、设置数据源等,基于mybatis
SqlSessionFactoryBuilder创建 SqlSessionFactoryBean,由于实现接口InitializingBean,所以初始化过程可以在方法afterPropertiesSet中可以看到;
主要用于加载配置文件信息,并解析为 Configuration 对象,组件结构如下:
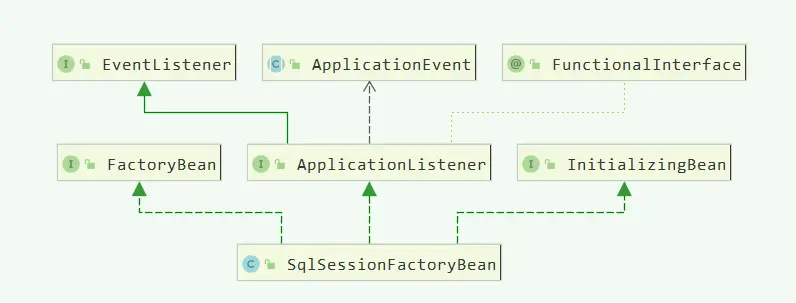

通过上图可看到 SqlSessionFactoryBean 也就是对Mybatis原生配置做了一层包装。
它实现了 InitializingBean 接口 afterPropertiesSet() 方法,这个方法会在 bean 的属性值设置完的时候被调用。
且还实现了 FactoryBean 接口,所以它初始化的时候,实际上是调用 getObject() 方法,调用的还是 afterPropertiesSet() 方法。
// 当SqlSessionFactoryBean第一次被实例化时,会调用getObject,这里Spring实例化机制有关
 @Override
  public SqlSessionFactory getObject() throws Exception {
    if (this.sqlSessionFactory == null) {
      afterPropertiesSet();// 调用属性初始化方法,初始化Mybatis SqlSessionFactory对象信息
    }
    return this.sqlSessionFactory;
  }
2
3
4
5
6
7
8
 @Override
  public void afterPropertiesSet() throws Exception {
    notNull(dataSource, "Property 'dataSource' is required");
    notNull(sqlSessionFactoryBuilder, "Property 'sqlSessionFactoryBuilder' is required");
    state((configuration == null && configLocation == null) || !(configuration != null && configLocation != null),
              "Property 'configuration' and 'configLocation' can not specified with together");
    // 创建Mybatis SqlSessionFactory
    this.sqlSessionFactory = buildSqlSessionFactory();
  }
2
3
4
5
6
7
8
9
SqlSessionFactory初始化
protected SqlSessionFactory buildSqlSessionFactory() throws IOException{
    final Configuration targetConfiguration;
    XMLConfigBuilder xmlConfigBuilder = null;
    // 判断 Configuration 对象是否已经存在,也就是是否已经解析过。如果已经有对象,就覆盖一下属性
    if (this.configuration != null) {
      targetConfiguration = this.configuration;
      if (targetConfiguration.getVariables() == null) {// 设置配置变量信息
        targetConfiguration.setVariables(this.configurationProperties);
      } else if (this.configurationProperties != null) {
        targetConfiguration.getVariables().putAll(this.configurationProperties);
      }
    } else if (this.configLocation != null) {// 指定的配置路径不为空,则根据路径解析XML文件
      xmlConfigBuilder = new XMLConfigBuilder(this.configLocation.getInputStream(), null, this.configurationProperties);
      targetConfiguration = xmlConfigBuilder.getConfiguration();// 通过XML解析文件得到Configuraction
    } else {// 若configuration、configLocationd对象都不存在,则使用默认的配置
      LOGGER.debug(() -> "Property 'configuration' or 'configLocation' not specified, using default MyBatis Configuration");
      targetConfiguration = new Configuration();
      Optional.ofNullable(this.configurationProperties).ifPresent(targetConfiguration::setVariables);
    }

    // 若属性不为空,则赋值
    Optional.ofNullable(this.objectFactory).ifPresent(targetConfiguration::setObjectFactory);
    Optional.ofNullable(this.objectWrapperFactory).ifPresent(targetConfiguration::setObjectWrapperFactory);
    Optional.ofNullable(this.vfs).ifPresent(targetConfiguration::setVfsImpl);

    if (hasLength(this.typeAliasesPackage)) {
      String[] typeAliasPackageArray = tokenizeToStringArray(this.typeAliasesPackage,
          ConfigurableApplicationContext.CONFIG_LOCATION_DELIMITERS);
      Stream.of(typeAliasPackageArray).forEach(packageToScan -> {
        targetConfiguration.getTypeAliasRegistry().registerAliases(packageToScan,
            typeAliasesSuperType == null ? Object.class : typeAliasesSuperType);
        LOGGER.debug(() -> "Scanned package: '" + packageToScan + "' for aliases");
      });
    }

    if (!isEmpty(this.typeAliases)) {
      Stream.of(this.typeAliases).forEach(typeAlias -> {
        targetConfiguration.getTypeAliasRegistry().registerAlias(typeAlias);
        LOGGER.debug(() -> "Registered type alias: '" + typeAlias + "'");
      });
    }

    if (!isEmpty(this.plugins)) {
      Stream.of(this.plugins).forEach(plugin -> {
        targetConfiguration.addInterceptor(plugin);
        LOGGER.debug(() -> "Registered plugin: '" + plugin + "'");
      });
    }

    if (hasLength(this.typeHandlersPackage)) {
      String[] typeHandlersPackageArray = tokenizeToStringArray(this.typeHandlersPackage,
          ConfigurableApplicationContext.CONFIG_LOCATION_DELIMITERS);
      Stream.of(typeHandlersPackageArray).forEach(packageToScan -> {
        targetConfiguration.getTypeHandlerRegistry().register(packageToScan);
        LOGGER.debug(() -> "Scanned package: '" + packageToScan + "' for type handlers");
      });
    }

    if (!isEmpty(this.typeHandlers)) {
      Stream.of(this.typeHandlers).forEach(typeHandler -> {
        targetConfiguration.getTypeHandlerRegistry().register(typeHandler);
        LOGGER.debug(() -> "Registered type handler: '" + typeHandler + "'");
      });
    }

    if (this.databaseIdProvider != null) {//fix #64 set databaseId before parse mapper xmls
      try {
        targetConfiguration.setDatabaseId(this.databaseIdProvider.getDatabaseId(this.dataSource));
      } catch (SQLException e) {
        throw new NestedIOException("Failed getting a databaseId", e);
      }
    }

    Optional.ofNullable(this.cache).ifPresent(targetConfiguration::addCache);

    if (xmlConfigBuilder != null) {
      try {
        xmlConfigBuilder.parse();
        LOGGER.debug(() -> "Parsed configuration file: '" + this.configLocation + "'");
      } catch (Exception ex) {
        throw new NestedIOException("Failed to parse config resource: " + this.configLocation, ex);
      } finally {
        ErrorContext.instance().reset();
      }
    }

    targetConfiguration.setEnvironment(new Environment(this.environment,
        this.transactionFactory == null ? new SpringManagedTransactionFactory() : this.transactionFactory,
        this.dataSource));

    if (!isEmpty(this.mapperLocations)) {
      for (Resource mapperLocation : this.mapperLocations) {
        if (mapperLocation == null) {
          continue;
        }

        try {
          XMLMapperBuilder xmlMapperBuilder = new XMLMapperBuilder(mapperLocation.getInputStream(),
              targetConfiguration, mapperLocation.toString(), targetConfiguration.getSqlFragments());
          xmlMapperBuilder.parse();
        } catch (Exception e) {
          throw new NestedIOException("Failed to parse mapping resource: '" + mapperLocation + "'", e);
        } finally {
          ErrorContext.instance().reset();
        }
        LOGGER.debug(() -> "Parsed mapper file: '" + mapperLocation + "'");
      }
    } else {
      LOGGER.debug(() -> "Property 'mapperLocations' was not specified or no matching resources found");
    }
    // 这里就回到Mybatis的SqlSessionFactoryBuilder类,创建SqlSessionFactory对象
    return this.sqlSessionFactoryBuilder.build(targetConfiguration);
}
2
3
4
5
6
7
8
9
10
11
12
13
14
15
16
17
18
19
20
21
22
23
24
25
26
27
28
29
30
31
32
33
34
35
36
37
38
39
40
41
42
43
44
45
46
47
48
49
50
51
52
53
54
55
56
57
58
59
60
61
62
63
64
65
66
67
68
69
70
71
72
73
74
75
76
77
78
79
80
81
82
83
84
85
86
87
88
89
90
91
92
93
94
95
96
97
98
99
100
101
102
103
104
105
106
107
108
109
110
111
112
113
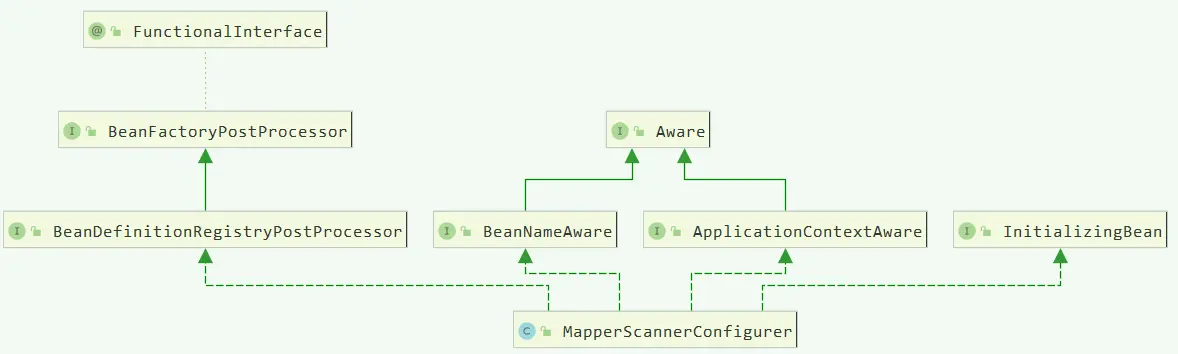
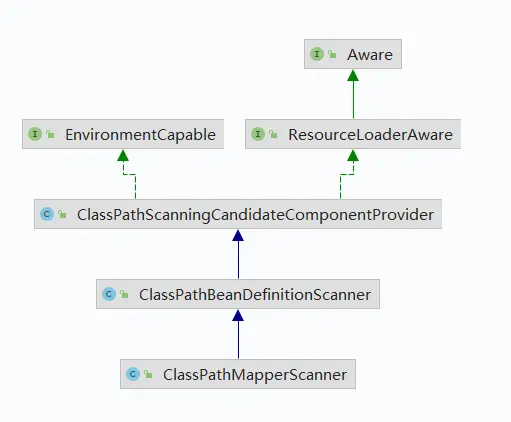
- MapperScannerConfigurer 配置自身属性信息,根据
ClassPathMapperScanner扫描指定包名接口,注册到Spring容器中;
顾名思义,从命名就知道,它主要配置 Mapper 接口的扫描配置的,负责将 Mapper 接口加载到 Spring 容器中,它继承了BeanDefinitionRegistryPostProcessor,ApplicationContextAware、BeanNameAware;其实具体 Mapper 扫描注册到 Spring 容器是由ClassPathMapperScanner 来完成的。

// 在classpath下扫描指定包下的类文件,并注册到DefaultListableBeanFactory中,也就是Spring管理容器中
@Override
  public void postProcessBeanDefinitionRegistry(BeanDefinitionRegistry registry) {
    if (this.processPropertyPlaceHolders) {
      processPropertyPlaceHolders();
    }

    ClassPathMapperScanner scanner = new ClassPathMapperScanner(registry);
    scanner.setAddToConfig(this.addToConfig);//在Mapper不存在时,是否自动添加Mapper
    scanner.setAnnotationClass(this.annotationClass);
    scanner.setMarkerInterface(this.markerInterface);
    scanner.setSqlSessionFactory(this.sqlSessionFactory);//设置SqllSessionFactory
    scanner.setSqlSessionTemplate(this.sqlSessionTemplate);//设置sqlSessionTemplate
    scanner.setSqlSessionFactoryBeanName(this.sqlSessionFactoryBeanName);//设置SqllSessionFactory Name ,不是引用类型
    scanner.setSqlSessionTemplateBeanName(this.sqlSessionTemplateBeanName);//设置sqlSessionTemplateBean Name ,不是引用类型
    scanner.setResourceLoader(this.applicationContext);
    scanner.setBeanNameGenerator(this.nameGenerator);
    scanner.registerFilters();
    //扫描包,注入Spring 容器
    scanner.scan(StringUtils.tokenizeToStringArray(this.basePackage, ConfigurableApplicationContext.CONFIG_LOCATION_DELIMITERS));
  }
2
3
4
5
6
7
8
9
10
11
12
13
14
15
16
17
18
19
20
21
从上面源码可看出,不管是使用,还是 <mybatis-spring:scan base-package="com.bdr.crud.dao"/> 和注解方式 @MapperScan 原理都是一样的,也就是将类加载到Spring容器中
接下来继续追踪 scan 方法,其实调用 doScan(basePackages) 进行扫描,且 ClassPathMapperScanner 对该方法做了重写覆盖。
//ClassPathBeanDefinitionScanner#scan
public int scan(String... basePackages) {
	int beanCountAtScanStart = this.registry.getBeanDefinitionCount();
	doScan(basePackages);
	// Register annotation config processors, if necessary.
	if (this.includeAnnotationConfig) {
		AnnotationConfigUtils.registerAnnotationConfigProcessors(this.registry);
	}
	return (this.registry.getBeanDefinitionCount() - beanCountAtScanStart);
}
2
3
4
5
6
7
8
9
10
//ClassPathMapperScanner
public Set<BeanDefinitionHolder> doScan(String... basePackages) {
    Set<BeanDefinitionHolder> beanDefinitions = super.doScan(basePackages);
    if (beanDefinitions.isEmpty()) {
        LOGGER.warn(() -> "No MyBatis mapper was found in '" + Arrays.toString(basePackages) + "' package. Please check your configuration.");
    } else {
        processBeanDefinitions(beanDefinitions);
    }
    return beanDefinitions;
}

private void processBeanDefinitions(Set<BeanDefinitionHolder> beanDefinitions) {
GenericBeanDefinition definition;
    for (BeanDefinitionHolder holder : beanDefinitions) {
        definition = (GenericBeanDefinition) holder.getBeanDefinition();
        String beanClassName = definition.getBeanClassName();
        LOGGER.debug(() -> "Creating MapperFactoryBean with name '" + holder.getBeanName()+ "' and '" + beanClassName + "' mapperInterface");
        // 将源 mapper 接口 class 作为 MapperFactoryBean 构造函数入参。
        // 实例化MapperFactoryBean时使用
        definition.getConstructorArgumentValues().addGenericArgumentValue(beanClassName); // issue #59
        definition.setBeanClass(this.mapperFactoryBean.getClass());//Mapper实例化时使用MapperFactoryBean来完成

        //为mapperFactoryBean设置属性 addToConfig、sqlSessionFactory、sqlSessionTemplate 实例值
        //sqlSessionTemplate 实现 SqlSession 接口
        //当为自定义sqlSessionTemplate时,可以通过 sqlSessionFactory 创建。
        definition.getPropertyValues().add("addToConfig", this.addToConfig);
        boolean explicitFactoryUsed = false;
        if (StringUtils.hasText(this.sqlSessionFactoryBeanName)) {
            definition.getPropertyValues().add("sqlSessionFactory", new RuntimeBeanReference(this.sqlSessionFactoryBeanName));
            explicitFactoryUsed = true;
        } else if (this.sqlSessionFactory != null) {
            definition.getPropertyValues().add("sqlSessionFactory", this.sqlSessionFactory);
            explicitFactoryUsed = true;
        }

        if (StringUtils.hasText(this.sqlSessionTemplateBeanName)) {
        if (explicitFactoryUsed) {
            LOGGER.warn(() -> "Cannot use both: sqlSessionTemplate and sqlSessionFactory together. sqlSessionFactory is ignored.");
        }
        definition.getPropertyValues().add("sqlSessionTemplate", new RuntimeBeanReference(this.sqlSessionTemplateBeanName));
        explicitFactoryUsed = true;
        } else if (this.sqlSessionTemplate != null) {
            if (explicitFactoryUsed) {
                LOGGER.warn(() -> "Cannot use both: sqlSessionTemplate and sqlSessionFactory together. sqlSessionFactory is ignored.");
            }
            definition.getPropertyValues().add("sqlSessionTemplate", this.sqlSessionTemplate);
                explicitFactoryUsed = true;
         }

        if (!explicitFactoryUsed) {
            LOGGER.debug(() -> "Enabling autowire by type for MapperFactoryBean with name '" + holder.getBeanName() + "'.");
            definition.setAutowireMode(AbstractBeanDefinition.AUTOWIRE_BY_TYPE);
        }
    }
}
2
3
4
5
6
7
8
9
10
11
12
13
14
15
16
17
18
19
20
21
22
23
24
25
26
27
28
29
30
31
32
33
34
35
36
37
38
39
40
41
42
43
44
45
46
47
48
49
50
51
52
53
54
55
扫描需要注入的 Mapper 接口,需要注入实例化时,其实是通过 MapperFactoryBean 来完成的,重点就在于 definition.setBeanClass(this.mapperFactoryBean.getClass()),替换掉原 Mapper Class,在 Spring 容器实例化注入Mapper 时,通过 MapperFactoryBean#getObject 获取 Mapper 代理。
- MapperFactoryBean 实现 Spring 的 FactoryBean 接口,采用 Spring 机制来实例化 Mapper,最终还是委托给 SqlSession; 同时若未自定义 SqlSessionTemplate,可通过 MapperFactoryBean 创建。
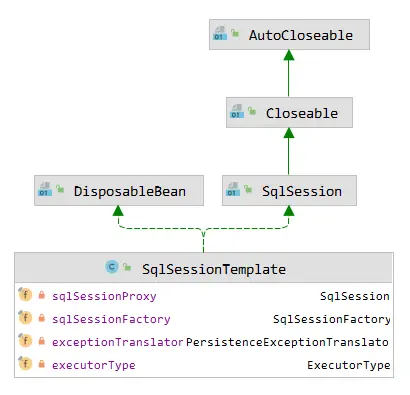
- SqlSessionTemplate 是Spring基于 SqlSession 封装的线程安全的模板类,用于适配 Mybatis 原生
DefaultSqlSession,这里并不是替代DefaultSqlSession,而是在其基础上通过代理装饰增强。
在Spring集成中,并不是直接使用 DefaultSqlSession 的,而是对它进行了一个封装,这个 SqlSession 的实现类就是 SqlSessionTemplate。这个跟Spring封装其他的组件是一样的,比如 JdbcTemplate,RedisTemplate 等等,也是Spring跟MyBatis整合的最关键的一个类。并且它是线程安全,SqlSessionTemplate 里面有 DefaultSqlSession 的所有的方法:selectOne()、selectList()、insert()、update()、delete(),不过它都是通过一个代理对象实现的。
// SqlSessionTemplate构造
 public SqlSessionTemplate(SqlSessionFactory sqlSessionFactory, ExecutorType executorType, PersistenceExceptionTranslator exceptionTranslator) {
    notNull(sqlSessionFactory, "Property 'sqlSessionFactory' is required");
    notNull(executorType, "Property 'executorType' is required");
    this.sqlSessionFactory = sqlSessionFactory;
    this.executorType = executorType;
    this.exceptionTranslator = exceptionTranslator;
    // 创建sqlSessionProxy代理
    this.sqlSessionProxy = (SqlSession) newProxyInstance(SqlSessionFactory.class.getClassLoader(),
        new Class[] { SqlSession.class }, new SqlSessionInterceptor());
  }
2
3
4
5
6
7
8
9
10
11
为什么要对 sqlSession 做一层代理呢? 其实上述跟踪源码发现,通过代理使用TransactionSynchronizationManager实现对 SqlSession 会话生命周期的维护管理。
那又为什么说 SqlSessionTemplate 是线程安全的?
首先 SqlSessionTemplate 内部实现中对 DefaultSqlSession 的一层封装,并且是基于代理的方式实现的,SqlSessionTemplate 内部定义了一个InvocationHandler 的实现 SqlSessionInterceptor 类。
  private class SqlSessionInterceptor implements InvocationHandler {
    @Override
    public Object invoke(Object proxy, Method method, Object[] args) throws Throwable {
      SqlSession sqlSession = getSqlSession(SqlSessionTemplate.this.sqlSessionFactory,
          SqlSessionTemplate.this.executorType, SqlSessionTemplate.this.exceptionTranslator);
      try {
        Object result = method.invoke(sqlSession, args);
        if (!isSqlSessionTransactional(sqlSession, SqlSessionTemplate.this.sqlSessionFactory)) {
          // force commit even on non-dirty sessions because some databases require
          // a commit/rollback before calling close()
          sqlSession.commit(true);
        }
        return result;
      } catch (Throwable t) {
        Throwable unwrapped = unwrapThrowable(t);
        if (SqlSessionTemplate.this.exceptionTranslator != null && unwrapped instanceof PersistenceException) {
          // release the connection to avoid a deadlock if the translator is no loaded. See issue #22
          closeSqlSession(sqlSession, SqlSessionTemplate.this.sqlSessionFactory);
          sqlSession = null;
          Throwable translated = SqlSessionTemplate.this.exceptionTranslator
              .translateExceptionIfPossible((PersistenceException) unwrapped);
          if (translated != null) {
            unwrapped = translated;
          }
        }
        throw unwrapped;
      } finally {
        if (sqlSession != null) {
          closeSqlSession(sqlSession, SqlSessionTemplate.this.sqlSessionFactory);
        }
      }
    }
  }
2
3
4
5
6
7
8
9
10
11
12
13
14
15
16
17
18
19
20
21
22
23
24
25
26
27
28
29
30
31
32
33
其内部类 SqlSessionInterceptor 的 invoke() 方法中的 getSqlSession() 方法,如果当前线程已经有存在的 SqlSession 对象,会在 ThreadLocal 的容器中拿到
SqlSessionHolder,获取 DefaultSqlSession。如果没有,则会new一个SqlSession,并且绑定到SqlSessionHolder,放到事务同步管理器中资源维护ThreadLocal类型变量中。SqlSessionTemplate 中在同一个事务中使用同一个SqlSession。
调用closeSqlSession()关闭会话时,如果存在事务,减少holder的引用计数;否则直接关闭SqlSession
在编程式的开发中,可使用Mybatis的 SqlSessionManager 类实现线程安全,它同时实现了 SqlSessionFactory、SqlSession接口,通过ThreadLocal容器维护SqlSession,其实原理同SqlSessioinTemplate机制相同。
- MapperScannerRegistrar 基于注解
@MapperScan、@MapperScans方式扫描 Mapper 包,注册到 Spring 容器中,扫描定义的包文件后,最后还是通过 ClassPathMapperScanner 来注册Bean的定义。
# 5. 总结
Mybatis 提供了很多强大的功能,它不像Hibernate那样完全基于面向对象封装,而是“半自动”方式实现,把自主权交给开发人员把控;而且提供强大的灵活动态SQL,可以直接构建SQL脚本,很方便完成各种复杂的功能;
支持SQL一级会话缓存、二级跨回话缓存、第三方缓存实现,用于降低数据库查询压力,通过对Mybatis的使用、框架执行源码分析洞悉内部执行原理,为后续更好的使用mybatis提供很大的帮助。
# 5.1. Mybatis工作流程
抛开核心处理之外的枝叶,核心出流程中涉及8大组件来完成整个ORM;采用原生 JDBC 编码需要些很多的样板代码,且大大降低了编码效率,通过阅读源码,发现 Mybatis 已经处理了大量工作,内部处理流程并不简单,那是因为它做了大量自动化工作。对原 JDBC 编码方式优化、工程抽象之后实现,虽然会有部分性能损耗,但是这都是微乎其微的。
# 5.2. Mybatis 的体系结构
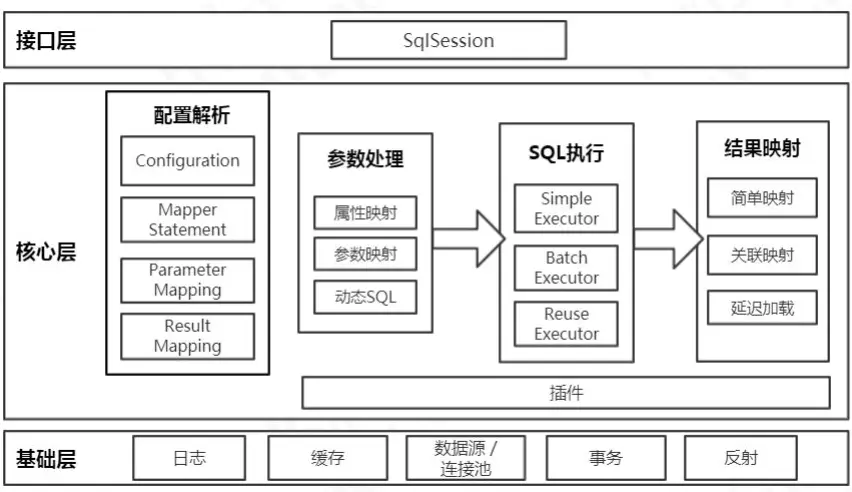
- 接口层
首先接口层是我们打交道最多的。核心对象是 SqlSession,它是上层应用和 MyBatis打交道的桥梁,SqlSession 上定义了非常多的对数据库的操作方法。接口层在接收到调用请求的时候,会调用核心处理层的相应模块来完成具体的数据库操作
- 核心层
与数据库的交互实现,具体数据库操作封装;主要包含:接下接口参数转换为指定JDBC类型,解析XML中的SQL到内存中,获取数据连接并执行SQL语句,最后获取操作数据类型转换为Java类型,并根据结果映射为指定Java对象;还有基于拦截器的插件处理机制。
- 基础层
首先接口层是我们打交道最多的。核心对象是 SqlSession,它是上层应用和 MyBatis打交道的桥梁,SqlSession 上定义了非常多的对数据库的操作方法。接口层在接收到调用请求的时候,会调用核心处理层的相应模块来完成具体的数据库操作
# 5.3. 设计模式的运用
在 Mybatis 中有很多借鉴学习的地方,使用到了许多设计模式来解决实际问题。
| 设计模式 | 类 | 说明 |
|---|---|---|
| 工厂 | SqlSessionFactory、ObjectFactory、MapperProxyFactory | |
| 建造者 | XMLConfigBuilder、XMLMapperBuilder、XMLStatementBuidler | |
| 单例模式 | SqlSessionFactory、Configuration、ErrorContext | |
| 代理模式 | 绑定:MapperProxy 延迟加载:ProxyFactory(CGLIB、JAVASSIT) 插件:Plugin Spring集成 MyBaits:SqlSessionTemplate的内部类 SqlSessionInterceptor MyBatis 自带连接池:PooledDataSource管理的 PooledConnection 日志打印:ConnectionLogger、StatementLogger | |
| 适配器模式 | logging模块,对于 Log4j、JDK logging 这些没有直接实现 slf4j 接口的日志组件,需要适配器 | |
| 模板方法 | BaseExecutor与子类 SimpleExecutor、BatchExecutor、ReuseExecutor | |
| 装饰器模式 | LoggingCache、LruCache 等对 PerpectualCache的装饰 CachingExecutor对其他 Executor的装饰 | |
| 责任链模式 | InterceptorChain | 通过创建层层代理,实现链化结构 |